IT setup and cloud transfer
Download this guide as Word (.docx)
Audience: IT administrators.
This guide covers one property's journey from Setup to a completed cloud transfer:
- Prepare your workstation (once).
- Commission the property: SmartThings, Yale and Airzone accounts.
- Invite the installer to the property's SmartThings site. The installer fits and commissions the devices. See the installer mobile checklist.
- Cloud transfer: link Yale to SmartThings, remove installer access, then move passwords onto a hardware key.
Your Broadford administrator gives you the keys and credentials this guide needs, including each property's SmartThings API key. Never paste passwords, tokens or API keys into tickets, chat or error reports.
Open every supplier sign-in in a new private (incognito) window. This covers ST Pro, the Yale OAuth URL and Airzone registration. Close all private windows before you start on the next account or property. Private tabs share one session while any private window is open. A tab left open from the last property can authorise the wrong Yale account, or sign you in to the wrong ST Pro account.
Prepare your workstation
Accounts you need
| Account | Used for |
|---|---|
Broadford web app (app.broadfordlife.com) with the IT Administrator role | IT Setup, Credentials and Cloud Transfers |
SmartThings Pro (smartthingspro.ai) accounts | Installer invitations and the ST Pro token |
| A SmartThings installer account | Signing in to the SmartThings Pro installer app during cloud transfer |
| Broadford Password App and a hardware key | Moving supplier passwords onto the key at cloud transfer |
Android emulator
Use an Android emulator on your computer (for example the Android Studio emulator) rather than a phone. You copy long generated passwords from the web app into the supplier apps, and pasting into an emulator is far easier than typing on a phone.
In the emulator, sign in to Google Play and install:
- Yale Home, to create the property's Yale account.
- SmartThings Pro installer app, to link Yale devices to the property's SmartThings site.
Open Android Studio - More Actions, then click the Virtual Device Manager.
Software Apps
Please install Adobe Reader from the Microsoft Store (requires admin password). Please also install Yubico Manager https://developers.yubico.com/yubikey-manager/Releases/ for win64 .
Manage installer invitations
Installers can only work on a property after its SmartThings site has invited their SmartThings installer account. The SmartThings Pro installer app shows at most 10 properties per installer account. An installer who still holds invitations for finished properties may not see the property they have been sent to.
Part of your job is to:
- invite installers to the properties they are about to work on, from the ST Pro account that owns each property's site;
- remove invitations that are no longer needed, so each installer's list stays under the limit.
Use this section whenever an installer reports a missing property, and during cloud transfer.
Find the property's ST Pro account and site
Sites are spread across more than one ST Pro account. You must sign in to the account that owns the property's site; other accounts do not list it.
- In the web app, open the property's IT Admin → Setup and note the SmartThings Site ID.
- Sign in at
smartthingspro.aiwith one of the ST Pro accounts from Credentials. - Open the site picker at the top of the portal.
- Search for the property address or site ID.
- If the site is not listed, sign out and repeat with the next ST Pro account.
- Select the site.
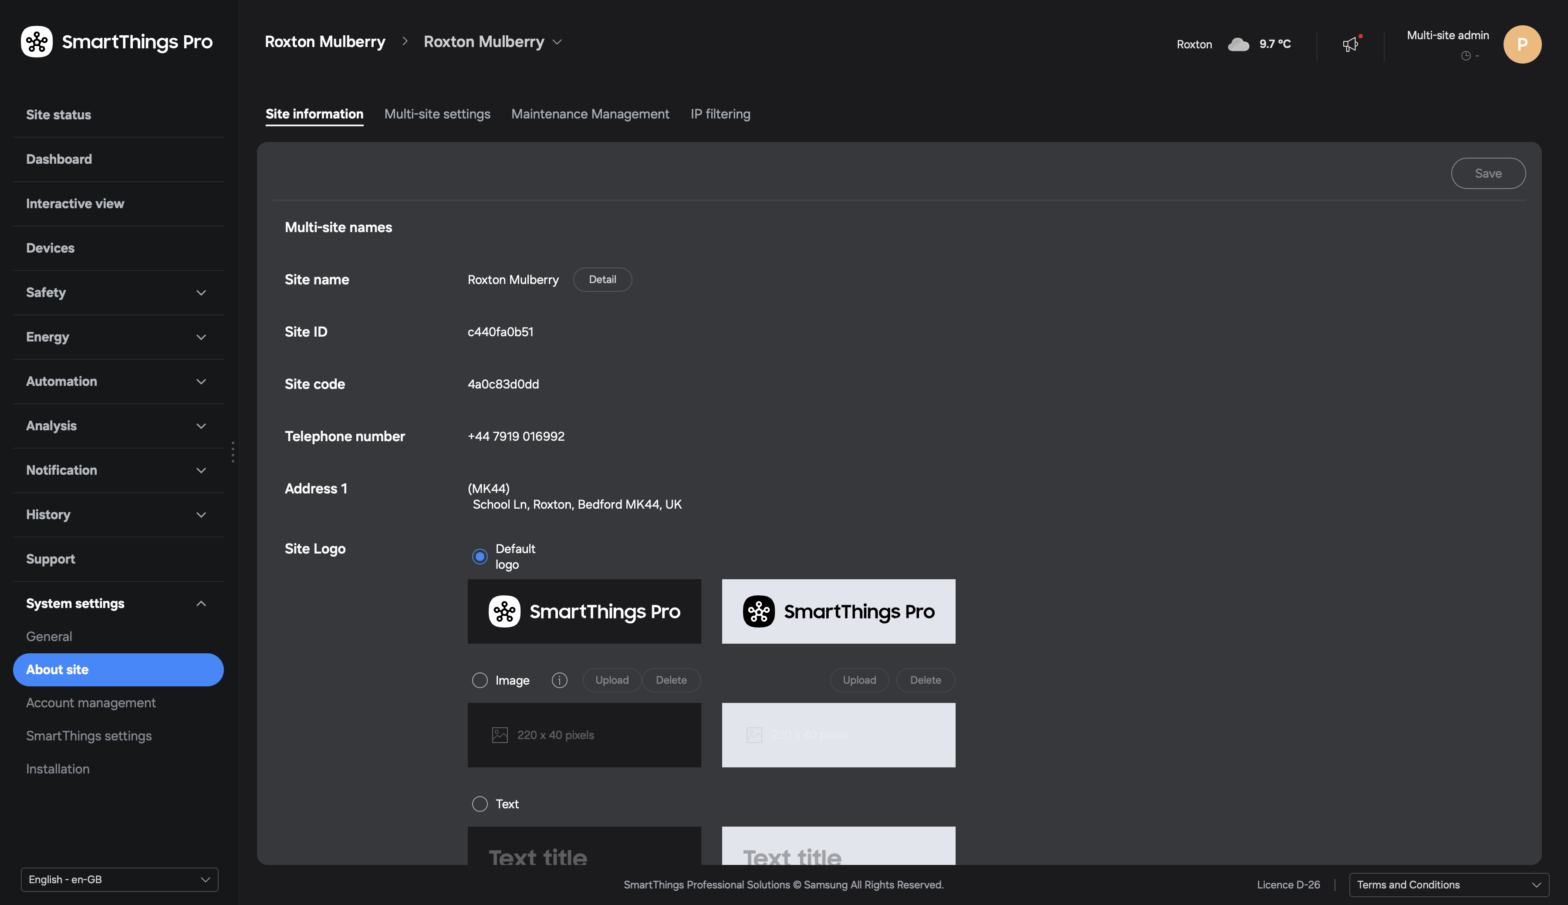
- Check System settings → About site → Site ID matches the ID you noted.
Invite an installer
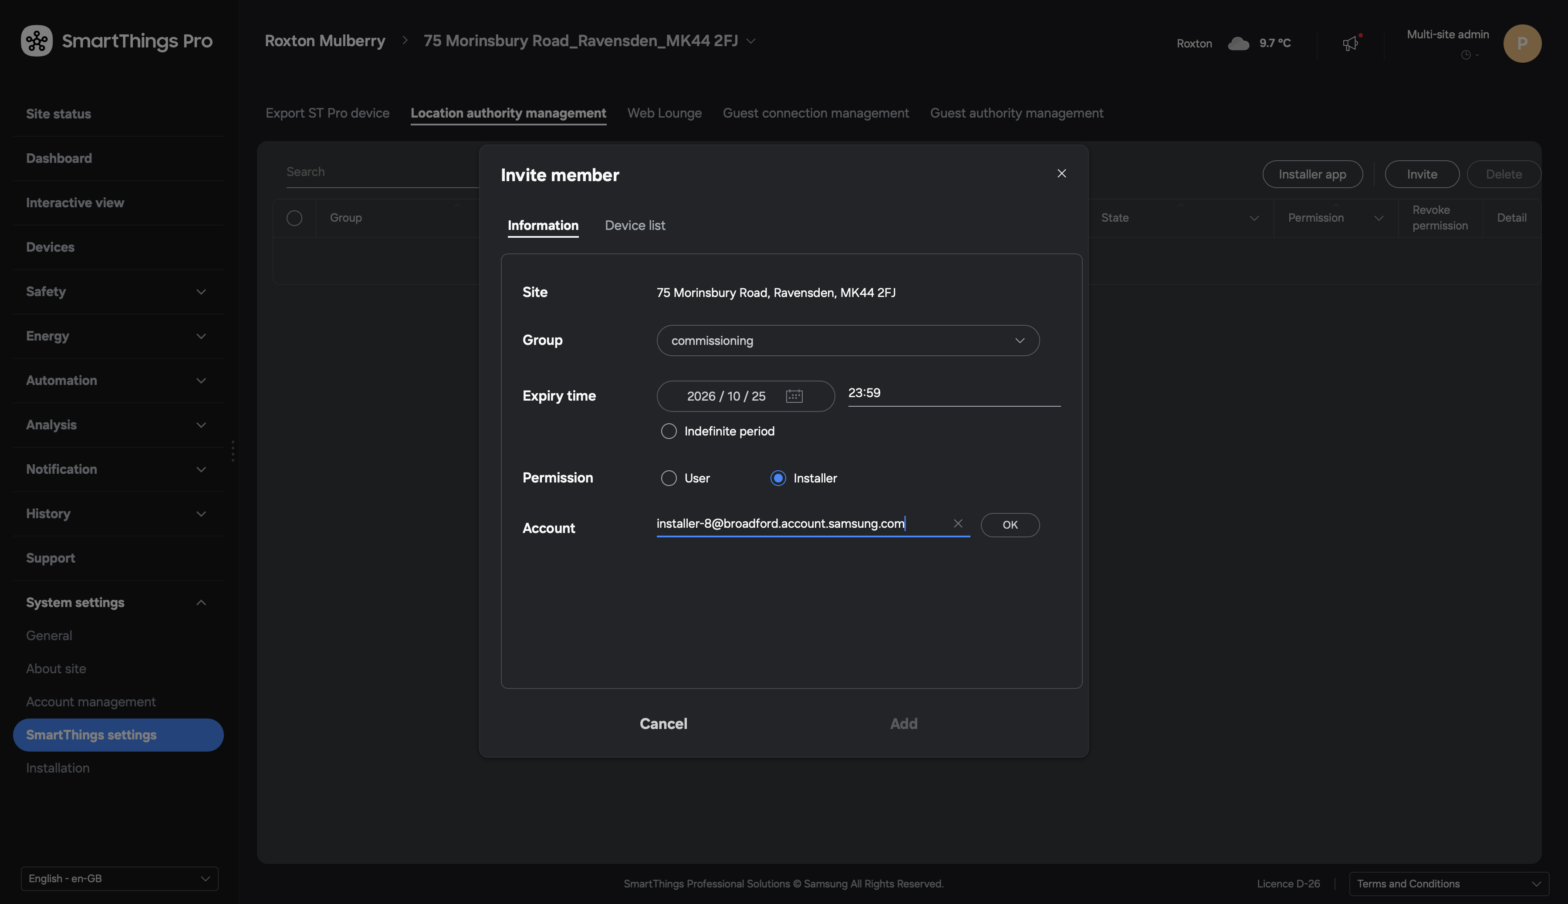
You need the installer's account ID. It is shown in the web app under Credentials → the installer's SmartThings credential → Account ID, for example installer-8@broadford.account.samsung.com.
- Find the property's ST Pro account and site and select the site.
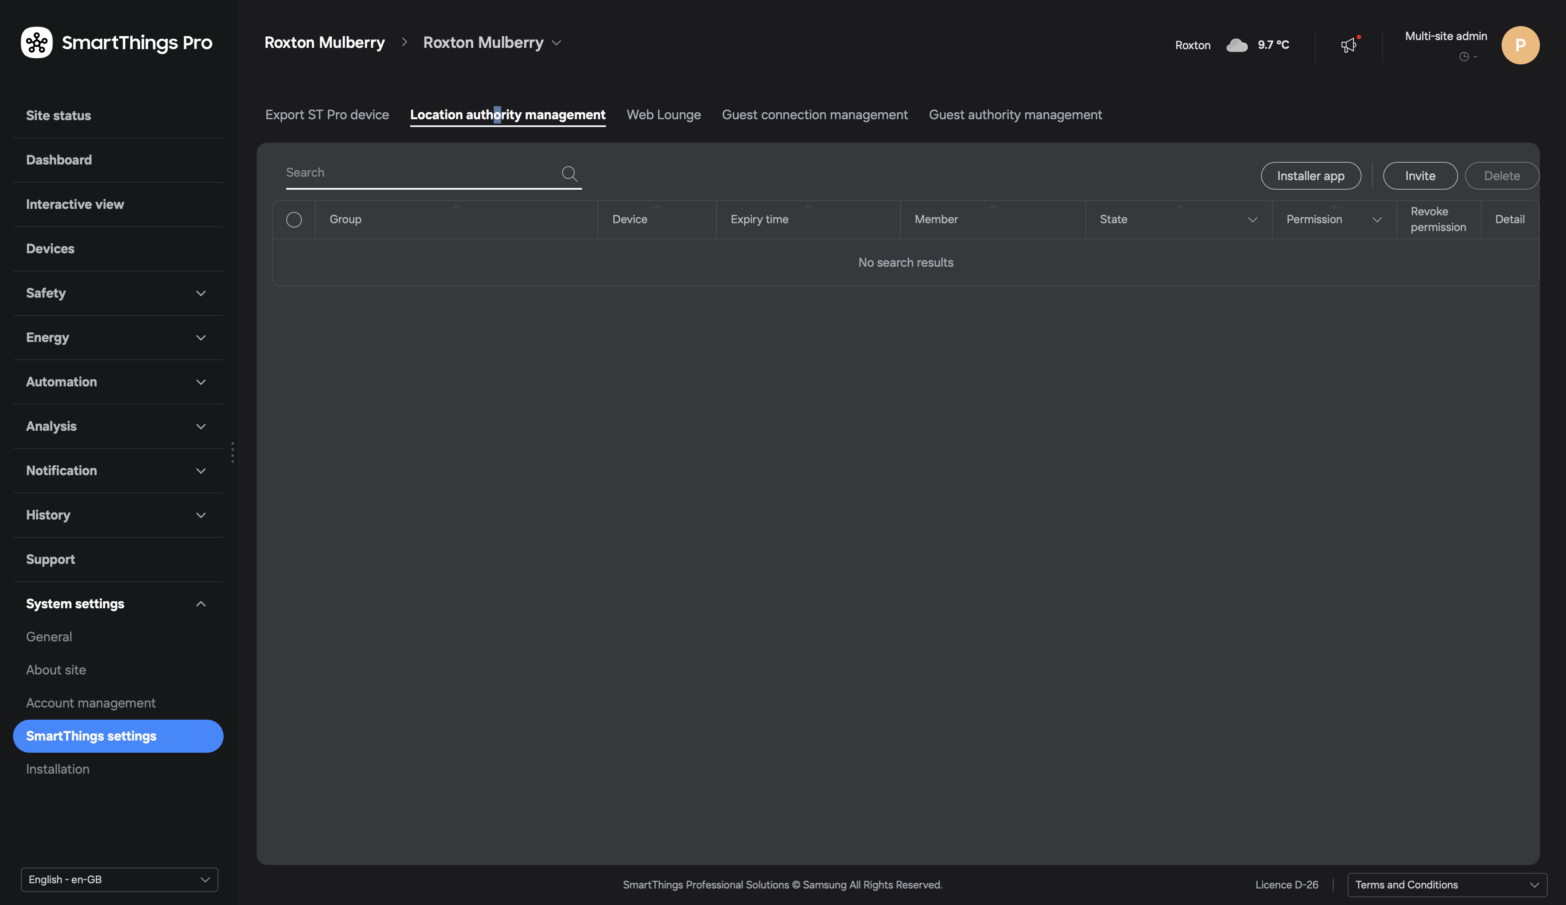
- Select System settings → SmartThings settings.
- Select Location authority management.
- Check the list. If the installer already has a current invitation, stop here.
- Select Invite.
- Select the Group, for example
commissioning. - Set an Expiry time a few days after the work is due to finish. Do not choose Indefinite period.
- Set Permission to Installer.
- In Account, enter the installer's account ID and select OK.
- Select Add.
- Ask the installer to accept the invitation and refresh the installer app.
If the installer still cannot see the property, they are probably at the 10-property limit. Remove their old invitations, then ask them to refresh.
Remove old invitations
An invitation is no longer needed when the installer has finished at the property, or the property has completed cloud transfer. Expired invitations can still appear in the list. Remove them as well.
- Find the property's ST Pro account and site for the old property and select the site.
- Select System settings → SmartThings settings → Location authority management.
- Select each invitation that is no longer needed.
- Select Delete.
- Repeat for each old property on the installer's list. Ask the installer which properties their app shows if you are unsure.
Do not delete an invitation for a property where installation is still in progress.
Commission the property
The property must exist with its rooms and devices, and have Setup status. See Site administration.
1. Create the SmartThings Pro site
Create the site from the web app, not from the ST Pro portal's Add sites dialog. The web app names the site after the property address and allows longer names than the portal.
The web app calls ST Pro with your own ST Pro session token. To copy it:
- In a new private window, sign in at
smartthingspro.ai. - Open your browser's developer tools and select the Network tab.
- Filter the requests by
/api. - Refresh the page, or open another page in the portal.
- Select any request to
/api/ums/..., such assites. - Under Request headers, find Authorization.
- Copy the value after
Bearer.
Then, in the web app:
- From the admin home screen, select IT Setup in the main menu.
- Open the ST Pro Token panel.
- Paste the value into Bearer Token.
- Check Account User ID matches the ST Pro account you signed in with.
- Enter the Parent Site ID. This is the site you have selected in the portal (shown under System settings → About site → Site ID).
- Save the token.
- Find the property with no matching site.
- Select Create ST Pro Site.
- Check the address, postcode and coordinates, then select Create Site.
The token expires after a short time. The ST Pro Token badge shows the minutes remaining. Copy a fresh token when it expires.
2. Initialise IT setup
- From IT Setup, find the property and select Open IT Admin.
- Select Setup.
- Select Initialize IT Setup.
- Check SmartThings Site ID. The web app matches the site you created to the property by address and prefills it. If it is empty, pick the property's site from the suggestions or select Use suggested site.
- Paste the property's SmartThings API Key.
- Select Initialize.
Initialising also generates the property's Yale and Airzone account emails and passwords.
3. Set up SmartThings groups and locations
Still in IT Admin → Setup, with a valid ST Pro token:
- Select Setup Groups. This creates the property's SmartThings groups and a location for each room, and links them to the property's location group.
- If a location-group warning appears, select Sync Location Group.
- Select Confirm SmartThings Setup.
Setup Groups deletes the site's existing non-default groups and their locations before rebuilding them. Run it once during commissioning, not as a refresh. An unsynced location group can make device discovery pick up devices from other sites, so do not skip the warning.
4. Create the Yale account and authorise it
- In the emulator, open Yale Home and create an account using the Yale email and password shown under Yale Credentials in IT Admin → Setup.
- Complete Yale's email or phone verification.
- Back in the web app, select Request OAuth Callback URL and copy the URL.
- Close any open private windows. Then open the URL in a new private window and sign in with the same Yale account.
- Approve access.
- Select Validate Yale.
This is the property's Yale admin account. The installer's Yale devices are added to it later.
To re-authorise Yale later, for example after the token stops working, go to IT Admin → Credentials. Request OAuth Callback URL is always shown under the Yale credential. Repeat steps 4–5 with the new URL.
5. Create the Airzone account (Aidoo properties only)
Skip this step if the property has no Aidoo thermostat.
- In a new private window, open the Airzone registration page: app.airzonecloud.com/#/auth/register.
- Register with the email and password shown under Airzone (Aidoo) in IT Admin → Setup.
- Refresh in the app, and you should see an activation link and confirm the account.
- Return to the web app and select Connect Aidoo.
A property with an Aidoo thermostat cannot complete IT setup until Aidoo connected shows.
6. Complete IT setup
Complete any other provider steps shown, such as Daikin. Then select Complete IT Setup. The property is now in commissioning and ready for the installer.
Cloud transfer
Start cloud transfer after the installer has finished and the property shows Commissioned.
1. Invite yourself as an installer
You need an installer account that is invited to this property's SmartThings site. Follow Invite an installer using your own installer account's ID. Skip this step if your installer account already has a current invitation.
2. Add the Yale devices in the SmartThings Pro installer app
Objective: link the property's Yale account to its SmartThings site, so every Yale device appears in SmartThings.
- In the emulator, open the SmartThings Pro installer app.
- Sign in with the installer account you invited.
- Open the property's site.
- Add a Yale device. Choose Yale Video Doorbell or Yale Alarm Hub, whichever the property has.
- When asked, sign in to Yale with the property's Yale admin account. The password is still the install-time password, because it is not yet on a hardware key. Copy it from IT Admin → Setup or the Broadford Password App.
- Approve the link.
Adding the Yale device often fails the first time. Retry until the app completes the link.
3. Verify the devices
- From the admin home screen, select Cloud Transfers in the main menu.
- Find the property card.
- Refresh the property's device checks.
- Check that every expected device is listed, including the Yale devices.
If a device is missing, fix it now. Installer access is removed in the next step.
4. Revoke installer invitations
Follow Remove old invitations for this property, and delete every invitation, including your own. Then refresh the property on Cloud Transfers and check Installer invitations revoked.
5. Move the passwords to a hardware key
Objective: replace each install-time supplier password with one derived from a hardware key. After this, nobody can sign in to the supplier accounts without that key.
- Open the Broadford Password App and sign in.
- Insert your hardware key.
- Search for the property.
- For each service listed as Not on a hardware key, start the reset and follow the wizard.
- Touch the key when asked. Deriving a password needs two touches.
- Set the new password with the supplier, as described below.
- Select Confirm reset for each service.
- Yale: sign in to the Yale Home app with the current password, then change the password in your profile to the new value.
- Airzone: use Forgot password on the Airzone site. The Change password link appears in the wizard. Set the new value there.
Keep the same key inserted until each reset is confirmed.
6. Complete cloud transfer
- From the admin home screen, select Cloud Transfers in the main menu.
- Refresh the property card.
- Check Passwords reset to a hardware key lists every service with a key.
- Select Complete Cloud Transfer.
- Check the card shows Cloud Transfer Complete.
- Test the device controls and a notification.
- Tell the property manager that handover is complete.
If the final step fails, check the card's current status before retrying. The transfer status can change before final synchronisation fails.
Continue with Property management for tenancy preparation.